Showing posts with label show 'n tell. Show all posts

Tuesday, January 25, 2011

Kitchen Parking Pad

We have a TV in the kitchen and I got tired of seeing this mess on the table …1627 And … where’s the pen?

So, I decided to make a place for everything and everything in its place.  I call it the “Parking Pad”.

I drew around each item on a piece of Freezer Paper:1634I took those rough measurements and came up with this layout in EQ7:101128The finished Parking Pad:1628
  And how it looks with everything in its place:
1629What you don’t see is the little notes I can hide away underneath it.  An added benefit – if I’m sitting across from the Parking Pad, I don’t have to get up to grab a control or the phone, I can just pull the Parking Pad towards me.

It’s the little things in life …

Sunday, September 12, 2010

Radiator Cover

100_1564 It all started with this article in Quilters Newsletter Magazine, dated October 2003.

100_1567The fabric above was bought specifically for the making of a wallhanging.  The fabric at top is a panel print and there are 4 fabrics below it.

100_0322 After cutting the pieces for 1 block, I decided I didn't want to make a whole bunch more – a little too much fussy-cutting.  So, I set the fabric and the block aside.

Then, came the winter of 2010. It was cold.  More days in a row of cold than we've ever experienced living in South Florida for 38 years. We bought a portable room radiator and used it more times in January thru March than I care to think about.

100_1565I knew just by looking at that radiator that it was going to be a dust-catcher! It needed a cover. I remembered that fabric and the lonely block.

I went into my EQ7 with my measurements for the radiator cover and started to design.  I even scanned my fabric so I could use it in the design in EQ7.  In order to make what looks like the panel print, I took a digital picture of the actual fabric and brought the image into EQ7.  If you do that, make sure the image is “square” so that the proportion will be correct.  You end up with some real silly looking images if you use rectangle-shaped images.fromEQRadiatorCoverBackEditedI took a screenshot of the upside-down back portion of design and brought it into MS Paint. I am delighted with Windows7 version of MS Paint. I can manipulate images with ease and it doesn’t have the learning curve that the high-end graphics programs do.

100_1527Here’s the layout, in progress, on the design wall.

100_1562 Here's all the layers pinned together, ready to be quilted.

100_1563After a couple of movies on the Hallmark Movie Channel, the "bones" of the cover are quilted and now the "fun quilting" begins …

I used Sulky Blendable 12 wt cotton thread for the quilting.  I like the heaviness of that thread.  Makes the stitching stand out.  I use a 90/14 Topstitch needle for the 12 wt. thread.

I find I get a better fit if I wash & dry the piece after quilting and before sewing the sides together.  Especially if I use cotton batting as I did in this project. 

100_1600Finished cover – front

100_1601 
Finished cover - back

Dolphins on a radiator?
In South Florida - but of course!

Monday, March 1, 2010

Reading Pillow Cover

Read on and you will see what I did with the fabric that gave me the scraps in the previous post.

I have some things that help to keep me "on track" when I quilt. Sometimes I use little patterns drawn on Freezer Paper and ironed on to the piece being quilted. Let me show you how I make ‘em.

I am using a block I found in Fons & Porter’s Love of Quilting magazine, Jan/Feb 2010, page 92, Star Rosette block by Nancy Mahoney.  I drew the block in EQ6.  I like to draw interesting blocks in EQ6, it gives me practice.

I use EQ6 to create quilting stencils --

Since I like to draw the stencil directly on the block, I need to bring the block back into EQ6 as an image that I can trace on. Use the "Export Image" tool and save the image (block I drew) to a Directory where you can find it. I created an IMAGES directory right off the EQ6 directory and put images in there that I will be using for tracing, etc.

Make a new block for drawing stencil motif
Block > New Block > PatchDraw Motif
Block > Import image for tracing (the quilt block I drew)

Using the Freehand tool on the Appliqué layer, draw out a design directly on the block. You will probably need to tweak it up some. Save to sketchbook.
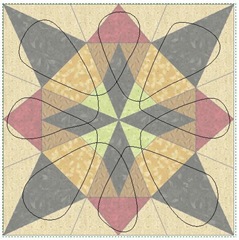
pillow01 Here's block with tweaked freehand
design drawn on it

pillow02 Saved drawn appliqué without
the block image underneath it

If I were using multiple quilt blocks in a quilt, I could then place the saved drawn appliqué onto each block in the quilt, to see how it would look on the finished quilt.

pillow03The repeat in the  drawn appliqué is 2 sizes of teardrops.  Convert the drawn design into guides – Block > Convert to Guides and then draw a template of a teardrop for each of the 2 different sized loops
Save to sketchbook.

pillow04

I then printed a 10" block of those 2 teardrops
Print > Templates

I could've printed the 8 teardrops templates onto Freezer Paper, but I was being conservative and find it easier to print one of a needed repeat and then trace it, staple it to layers of Freezer Paper for additional copies, having only to cut the template shape once.

Plus, I get to use up scraps of Freezer Paper.

1460Smaller teardrop traced to Freezer Paper
and stapled to sheets of more Freezer Paper

1463 Teardrops cut out

1464Teardrops ironed onto quilt sandwich,
ready to be quilted around

1466Another favorite guide for quilting lines
is Contact Paper.  It is repositionable
many times

And here’s my completed Reading Pillow, waiting in my Reading Chair.  I use the pillow to prop up my book.

1473 FYI, I always have a book in progress.  I just finished “Just Take my Heart” by Mary Higgins Clark and will be starting “Promise Me” by Harlan Coben.

Monday is one of DH’s & my movie nights.  We will be watching “The Painted Veil” from Netflix this evening.

Tuesday, January 19, 2010

Little Georgia Tote

1454I followed PlanetPatchWork on Twitter during Houston’s Quilt Market 2009.  They took pics of a lot of the new products and it was fun to see what they saw.  Lynn Holland wrote a review of the trip and said that Pat Sloan's Georgia bag class seemed to be most in demand on the “class wanted” board.

So, of course, I had to go to Pat Sloan’s website and see what Lynn was talking about.  I thought the tote was just the cutest thing and I had to order the kit.  This particular kit had all the items necessary to complete the tote.  Decorative threads were even included. The appliqués and rick-rack were already fused to the fabric. All the pieces were cut to size. And the bottom part was stitched to the front.  Most of the grunt work done – all I had to do was start the fun part. 

I had a good time choosing the various decorative stitches to hold those appliqués in place.  And the background was a nice place to practice some quilting motifs.

I haven’t yet decided what purpose this bag is going to serve, I just like the looks of it and all the bright colors used.  Right now it is hanging from a metal shower hook that is hooked under my ironing board.  What a convenient, out of the way place, to hang things.  And when I swivel around in my sewing chair, I can admire The Little Georgia Tote!

Thursday, November 19, 2009

Little mini gifts

I’ve been working, here & there, on some little gifts.1331The above is a “Travel Tray” from Angie’s site  
http://ajpadilla.com/freebies
I think it will come in handy on trips to hold things that might otherwise get misplaced.  There’s velcro in the corners which makes it possible for the tray to lay flat. 

Once you make one, you can figure out how to make them in any size.  Angie suggests to use a solid color fabric for the floor of the tray, but, I chose a fabric that “reads” solid and I like that.

1332And here’s Angie’s “15-minute Flower Brooch”.  I must say, it took me a little longer!  I am very pleased with the way it turned out, especially with the little beads I decided to sew to the center.  This can be used as a brooch as there is a pin sewn to the back.  And when you pin this brooch on your shirt, it becomes very handy to stick some pins in while hand sewing as the center is stuffed.  Sure beats sticking pins in your shirt!

I wrapped a gift in a Fat Quarter and pinned it shut with the brooch.  It made a nice presentation.

I made myself one of the Travel Trays, too.  And am going to have to make a brooch for me, too.   Or maybe I’ll try one of Angie’s “Finger Pincushions” made from a 3-1/2” fabric square.  Or maybe both!

Saturday, August 22, 2009

UFO complete – Purse with Trees scene!

Here’s the pieces of my new purse all constructed and cut out and ready to be sewn together.

1280This is the 3rd time I’ve made this purse.  Each one is different.  I got the idea for it from a “Triangular Cosmetic Bag” on Craftster.  One of those zippers on the back is for the main part of the purse – the place to put everything.  The other zipper is a smaller outside pocket.  There is also a pocket on the inside lining.

1283That’s the completed purse, all ready to go shopping!
And here’s the backside, showing the zippers --

1284 Top zipper opens to main part of bag.  Lower zipper is the small, but oh so convenient, outside pocket.  It holds my library card, a pen and some paper and some eyeglass wipes.

I used to carry a big purse.  One day I decided it was a nutty thing to do.  The bigger the purse, the more junk you haul around.  Now, that would make sense if you used half the stuff, but I found out I wasn’t.  The first thing I downsized was my wallet.  Went from a big leather thing with pictures in it and all kinds of stuff.  Got a small wallet which carries coins and paper money and IDs.

One day, I laid out all the stuff from my big purse and only put back into it the very barest of essentials.  I figured if I found I needed more stuff in the big purse, I could always put it in.  What I found myself doing was eliminating more stuff from the big purse!

Went shopping for a smaller purse and at the time, couldn’t find anything I liked.  So, went online and searched.  I found wristlets and then the cosmetic bag instructions which I found suited my needs.

My small purse goes on my shoulder and lays under my arm, very close.  They say that is the safe way to carry your purse – on a short strap, close to your body.

Besides what I normally carry in the purse, there is still room in it for my iPod Touch and earbuds and a cellphone.  I’m one of those few people who does not always carry a cellphone!  LOL  If I ever need to carry stuff that doesn’t fit in my small purse, I then throw the small purse into a tote bag along with my camera and other odd assorted things. 

Tuesday, August 18, 2009

WIP = UFO = WIP

WIP = Work In Progess, UFO = UnFinished Object

Here’s the front section of a small purse (for me), WIP:1270Here’s the reverse side to show the quilting -- 1271Did some Stitch-In-The-Ditch quilting around the scene in the middle. Added some curlicue wind to the scene. Bordered by overlapping tongue shapes.

What I found works good for purses is a 3-layer combo of fabric, 80- cotton/20-poly batting and non-fusible interfacing. The interfacing gives it some body.

I made the PaperPieced scene from the EQ CD “Town & Country Patchwork” by Cori Derksen & Myra Harder. I got inspired by those very same trees on that CD to make the Christmas Shopping Bag that I designed last winter.

I’m the type of quilter who likes to have several projects going all the time. So, I have a pile(s) of WIPs which turn into UFOs at some time or another and then back to being WIPS again. Right now, my UFOs outnumber WIPs! But, I do finish projects. Eventually.

Do you have more UFOs than WIPS?

You know, I’ve heard of quilters who start a project and stick with it until it’s complete! They never have UFOs. I’ve never actually met someone like that … just heard about them. Do those quilters really exist? Or did someone make that up to make the rest of us feel guilty!

Thursday, August 13, 2009

Feathered Star Layouts

090813I made a bunch of layouts in EQ6 and like these 2 and can’t decide which one I like better.  Which do you like – 1 or 2?

Now, to go and see if I have enuf of the lighter green fabric to make either version!  If I don’t, I will have to have another plan.

The setting triangles on the FS present an upcoming decision – what do I want to quilt there?  It’s a pretty big area.  Flowers?  Leaves on a vine?  Geometric?  Abstract?  I’m sure the quilt will talk to me as I work on it.  It happens every time!  The quilt seems to know what it wants.

Tuesday, August 11, 2009

My Feathered Star

1268 
Wow!  I’m happy with this block.  There are over 200 pieces in it.  And lots of match points!

It is a PaperPieced block and is from Sue Garman’s 2009 Block of the Month quilt from thequiltshow.com  It is the center of the quilt.  I did not want to commit to the whole quilt, but I sure liked this Feathered Star.  I also made a block from Sue G’s 2008 Block of the Month quilt.  It was appliqué.  Made it into a one-block wallhanging.

Now to go into EQ6 and see what kind of layout I can come up with for this wonderful Feathered Star.  I want to make a wallhanging and I know where I want to hang it, so I also know approximately what size WH I will be needing.

Now to go and have some fun playing in EQ6!

Saturday, April 18, 2009

More Fabric Baskets, nice gifts

I’ve been sewing away!  Made some more fabric baskets that I first found out about at the Pink Penguin blog -- http://ayumills.blogspot.com/2008/05/tutorial-fabric-basket.html

1066I like the different looks you get when you pick different colors from the focus fabric for the checkerboard rows.  Four fabrics used for each basket shown above.

1067If you click on the pic above, you will see a larger version of the pic and you will also see that I am in my “gridded wavy lines quilting” phase on my quilted pieces these days.  The gentle wavy lines are so easy to stitch and so relaxing.  No matter what you do, the quilting comes out looking great.  Try it sometime.  These fabric baskets are a good place on which to practice quilting.

1088I cut the striped fabric into squares for the checkerboard rows on the basket and when I laid out the rows, I rotated the squares so that a horizontal stripe was next to a vertical stripe.  I forgot to take a pic of it in the flat, but here’s a drawing from EQ6 to show you what I mean --

090417

When I first made a fabric basket --http://anotherpatch.blogspot.com/2008/11/its-lovely-day-after-election.html  I cut the lining shorter so that it would lay better in the inside of basket.

On the stripes and dots basket, I experimented & cut the lining the same size as the quilted piece.  I let the top seam allowance extend up.  Did NOT turn the top seam allowance to the inside of basket.  Much easier to stitch in the ditch through all the layers – no bulk.

In the pic below you can see that the lining fabric shows at the top cuz it is brought to the outside of basket, rather than being turned to the inside of basket.1085I like the “cut same size” method cuz I don’t have to do any figuring and the lining does lay nicely inside.

Here’s 3 finished baskets:1090Each of the baskets has a “secret pocket” in the lining bottom – a hiding place for secrets.

Angie Padilla has directions for a cute basket -- http://tinyurl.com/c46c2d  I’m just going to have to make one of those!

I have a few more things that either haven’t been completed or haven’t been gifted and will put them up on the blog when I’ve made it so.